The Big Brown Box
Silicon Graphics started the Personal Iris Series of machines with this model, the 4D/20. Powered by the then "new" MIPS 3000 RISC CPU (running at a staggering 12.5Mhz), it could take 16 or 32 megabytes of RAM, and contained an internal SCSI bus for a harddrive. It's strength over other Unix based workstations of the time was it's revolutionary graphics ability. The graphics processing was so powerful that very little work was actually done by the CPU. Providing real-time 24bit color, it was also capable of real-time polygon manipulation, making it a choice for CAD, realtime 3-D applications, virtual reality experiments, and of course, setting up and rendering 3-D sequences for movies like The Abyss, Terminator 2, and Jurrasic Park. Most of the Special Effects people working in Hollywood today cut their teeth on a machine like this one, creating some of the spectacular scenes we take for granted.
It's a big brown box -- and heavy too.4D/20 Introduced No info available yet... CPU (IP6) MIPS R3000 (12.5 MHz) with integrated MIPS FPA on board. Memory Integrated CPU memory on board (8 - 64 Mb), Standard 30-pin 9-chip parity SIMMS (80-100 ns). 8 Kb data cache, 16 Kb instruction cache. Performance 0.9 MFLOPS (double precision) 10 MIPS 7.5 SPEC Graphics "Entry", "TG" Software Will supposedly run up to IRIX 5.3 (IRIX 4.0.5 recommended because of CPU speed limitations) Notes First Personal IRIS in the series.
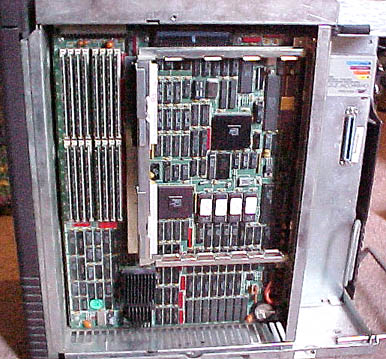
Opening the Beast
SGI machines are heavy because they are encased in steel - don't let that plastic covering fool you. The plastic itself is called a "skin" by SGI, and that's really all it is -- just a covering providing little purpose beyond the asthetic. To remove the skin, so you can access the insides, you must unlock the left side from the right side. When you are facing the rear of the machine, the left side will be able to be easily removed after it's unlocked. Simply turn the enormous dial. Pull off the left side skin. You'll now be able to see the rear ports and the metal sheet that covers the CPU card.
It should be noted that the SGI engineers went to great lengths to make everything nice and neat. Notice that while the skin is on, all the rear ports are covered by the skin, and all the cables going into and out of the machine all exit from a small opening near the bottom (cut off in the photo, and providing a steel rod to attach wires to -- to act as a strain relief.
Before we get into the insides, let's first examine the ports on the rear that we now have access to them -- and there are a lot of ports.
The Rear Ports
I've had to split this into two photos because there's just so much ground to cover.
The first thing you'll notice is the ethernet connector (the grey plastic box). This is a 15pin AUI port to which I have an 10 base-T transciever attached.
Next to that is the ???? connector.
Underneath the ethernet connector is the DB25 parallel port. Every SGI have known has a parallel port, but I've never seen one actually being used. I assume it was for connecting industry-standard printers, but I've never seen an SGI connected directly to a printer.
Then is the BNC connector labeled "Genlock Clock". I'm not sure what this was used for, but if the SGI had video in as well as out, then a genlock clock could be used for overlaying computer generated graphics onto real-time NTSC video. It's possible that this BNC connector *is* the video in. I've never used it, so I admit to cluelessness here.
Below that are the BD9 connectors of serial ports 1 and 2. Like a Sun Microsystems machine, if the computer powers on with no monitor or keyboard attached (see my serial console FAQ), then the machine will route console to serial 1 and you can hook a dumb terminal to serial 1 and issue commands from there.
However, if you are going to run IRIX and run it with graphics, don't try and run anything higher than IRIX 5.3 - it just won't work at all. Even with IRIX 5.3, you'll find it painfully slow to use because of the limited memory. IRIX 4.0 or below might be more appropriate for this machine.
Continuing with the ports in the rear, we have:
Below serial port 2 is the 9-pin keyboard port. This is custom keyboard port, before the days that SGI started using standard PC keyboards. Continuing down on the leftmost side are the audio in, microphone and audio out ports, all as mini-jacks (like on a PC soundcard). In and Out are line-level, while the microphone port takes a standard microphone.
Next to Keyboard port, again, going down are 3 BNC style connectors. They are the RGB connectors for the monitor - with sync going through the green, I believe. This is the recommended way to hook the monitor, but you'll notice that below the RGB ports is a HD-15 port for a VGA-style monitor.
Now, the Iris puts out a pretty high-res signal, so if you decide to hook a monitor to it, make sure it's a good multi-sync that supports 1280 x 1024.
The inverted "U" shaped piece of steel that you see between the ports and brown exterior of the right side of the case is the cable guide/strain relief - bascially, after you hook up all the cables you're going to need, and BEFORE you put the case back together, the idea here is to guide all your cables through this thing and then also use cable-ties or something similar to secure the cables. This way if someone trips over your monitor cable, they don't accidentally disconnect that cable from the computer (and then you have to disassemble the machine to get to the ports again), nor do they destroy the cable by separating the wires from the connector.
And let's not forget the SCSI port. You probably saw it back near the top of this page when I first started discussing the rear ports. This is a clearer shot as the previous image had it partially blocked by the brown plastic. The SCSI port is at a right angle to the other ports on the machine, and is a 50pin centronics style connector.
From this image you can also appreciate how deeply inset the ports are from the rear edge of the body. As I said, once you get your cables connected, you want to use the cable ties so that nothing comes loose! You can't just reach around the back and wiggle.